
Easy Crispy Baked Chicken Wings
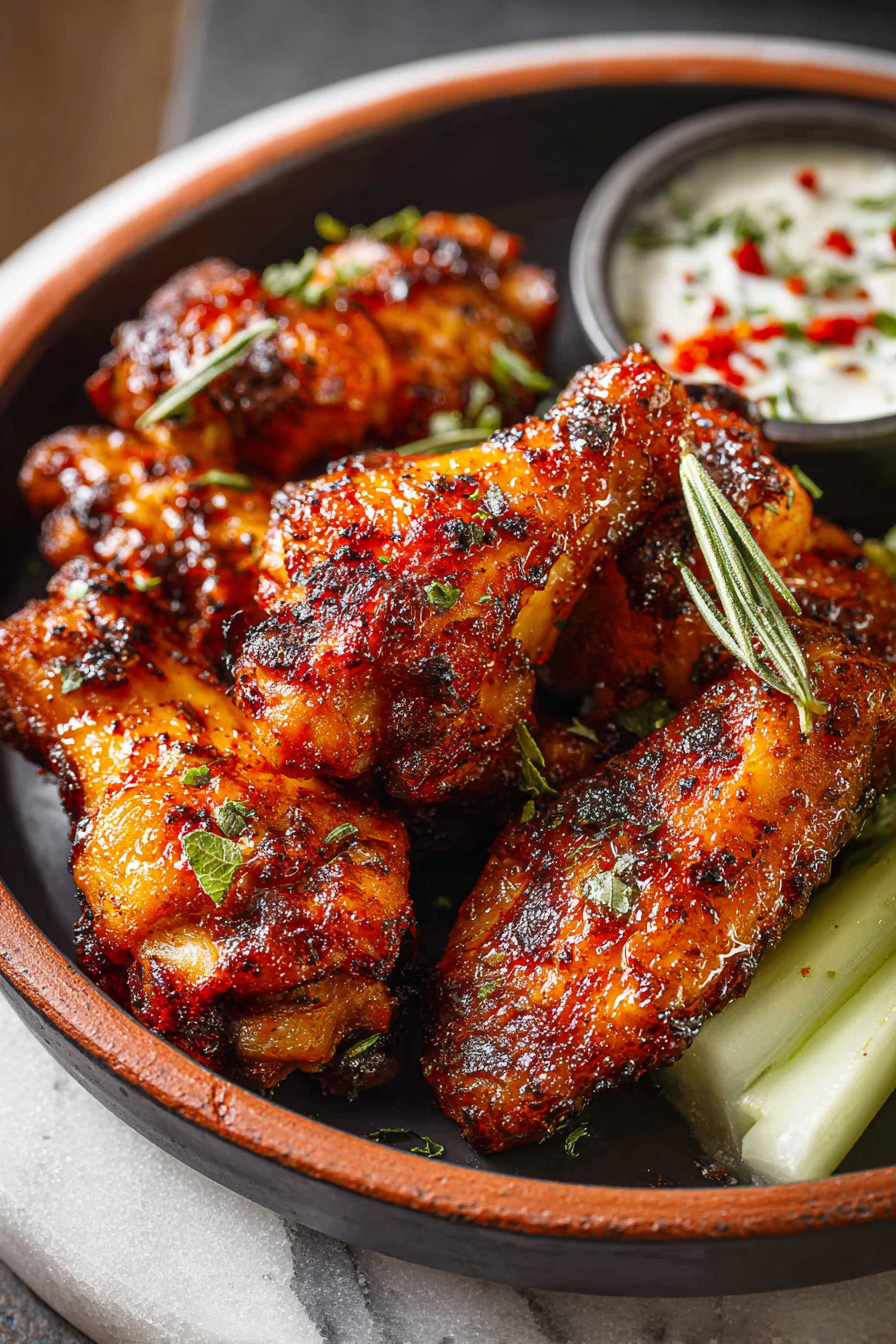
These baked wings are the kind that get everyone to the kitchen — super-crispy skin, tender meat, and all the flavor without standing over a pot of oil. The trick is simple: dry the skin, use a little baking powder for that extra crunch, and give them space on the pan. It’s an easy, mostly hands-off method that works whether you want naked, buffalo, honey-garlic, or sticky barbecue wings.
My husband is officially the wing taste-tester in our house; he’ll happily sample every glaze and declare one “the winner” for the week. Our kiddo learned to dip early on — ranch for weekday dinners, blue cheese for weekend game nights — and this recipe has become our default when friends drop by. It’s one of those crowd-pleasers that’s forgiving, quick enough for a weeknight, and festive enough for a small party.
Why You’ll Love This Easy Crispy Baked Chicken Wings
– Crispy skin without deep-frying: a light dusting of baking powder and high oven heat mimic that fry texture.
– Pantry-friendly ingredients: common spices and oil, no specialty equipment needed.
– Versatile finishing: bake first for crispness, then toss in any sauce or glaze you love.
– Hands-off cooking: most of the time is oven time, not prep time — great for multitasking.
– Crowd-pleaser: kid-approved, adult-approved, and easy to scale up for a group.
Behind the Recipe
This method grew out of wanting the crunch of fried wings with less mess and a bit more predictability. The small but mighty baking powder step is what many home cooks miss — it dries and raises the skin, making it crackle in the oven. Space and airflow are the other stars: wings need room to crisp, so a wire rack over a sheet pan or a single layer on a rimmed pan is worth the extra step. People often over-sauce too early; sauce after the wings are crisp for the best texture. I also learned the hard way that tossing cold, wet wings into the oven is a shortcut to steam, not crunch — patting them dry is non-negotiable.
These wings were delightfully crispy straight from the oven and super simple to make — a perfect weeknight option. I would add a touch more seasoning or a quick sauce after baking for extra flavor, but overall a reliable, tasty recipe.
Shopping Tips
– Protein: Choose fresh, split wings (drumettes + flats) if possible — they cook evenly and are easier to serve.
– Fats & Oils: Use neutral oil with a high smoke point (canola or vegetable) for a light coat that helps browning without flavor interference.
– Spices: Keep basic dried spices on hand (paprika, garlic powder, onion powder); they form a reliable dry rub when combined with salt and pepper.
– Frozen Aisle: Frozen wings are fine — thaw fully and pat dry before baking; avoid cooking from frozen or they’ll steam and won’t crisp.
– Fresh Herbs: Buy parsley or chives if you want a fresh finish; they brighten sauced wings right before serving.
Prep Ahead Ideas
– Pat and dry the wings and toss them with the dry rub the night before; keep them uncovered in the fridge on a tray to dry further for even better crisping.
– Mix your sauce or glaze ahead and store in an airtight jar in the fridge for up to 3 days.
– Measure spices and baking powder into a small container or zip-top bag so assembly is quick on a busy evening.
– Store prepped wings in a shallow container for up to 24 hours; bring them to room temperature briefly before baking for more even cooking.
Time-Saving Tricks
– Buy pre-separated wingettes and drumettes to skip cutting time.
– Use two sheet pans on different racks and rotate them halfway through if you’re making a lot — helps avoid overcrowding.
– Keep a jar of ready-made buffalo or barbecue sauce for instant tossing if you’re short on time.
– Mise en place: line your pan and set a cooling rack, a brush, and your sauce bowl out before the wings hit the oven — it makes the final toss fast and tidy.
– If you have an air fryer, you can crisp smaller batches faster; finish a large batch in the oven if needed.
Common Mistakes
– Not drying the wings: I did this once and they steamed instead of crisping; always pat them thoroughly.
– Using baking soda instead of baking powder: baking soda will change flavor and doesn’t provide the same crisping effect.
– Overcrowding the pan: wings need air around them — overcrowded wings go soggy.
– Tossing in sauce too early: the sauce can keep the skin from staying crisp; toss just before serving.
– Overbaking small wings: they can become dry — check early and remove when the skin is deeply golden and the meat reaches safe temperature.
What to Serve It With
– Classic sides: celery and carrot sticks with ranch or blue cheese dressing.
– Starch pairings: thick-cut fries, sweet potato wedges, or a pile of steamed rice.
– Lighter options: crisp green salad or slaw to cut the richness.
– Party pairings: sliders, pickles, and an assortment of dipping sauces let guests customize.
Tips & Mistakes
A few practical pointers: always space wings out, pat them dry, and wait to sauce until they’re done. If you want extra browning, switch to broil for the last 1–2 minutes but watch closely. If they’re limp after saucing, give them a quick bake on a lined rack to re-crisp.
Storage Tips
Store in airtight containers in the fridge. It reheats beautifully, but if you sneak a bite cold straight from the container, it still works. Reheat on a wire rack in a 400°F (200°C) oven for 8–10 minutes to restore crispness, or pop small portions into a hot air fryer for 3–4 minutes.

Variations and Substitutions
– Buffalo: toss with melted butter and hot sauce after baking for the classic tangy finish.
– Honey-Garlic: whisk honey, soy sauce (or tamari for gluten-free), garlic, and a splash of vinegar; brush on during the last 2–3 minutes to keep it glossy.
– Barbecue: finish wings in a warmed BBQ sauce and broil briefly for sticky edges.
– Spice swaps: smoked paprika for regular paprika adds depth; cayenne adjusts heat precisely.
– If you skip the baking powder, try a light dusting of cornstarch — it helps with crisping but won’t replicate the lift baking powder gives.
Frequently Asked Questions
Easy Crispy Baked Chicken Wings
Ingredients
Main Ingredients
- 2 pounds chicken wings fresh or thawed
- 1 tablespoon olive oil
- 1 teaspoon salt
- 0.5 teaspoon black pepper
- 1 teaspoon garlic powder
- 1 teaspoon paprika
Instructions
Preparation Steps
- Preheat the oven to 425°F (220°C) and line a baking sheet with aluminum foil.
- In a large bowl, combine the chicken wings, olive oil, salt, black pepper, garlic powder, and paprika. Toss until the wings are well coated.
- Arrange the wings in a single layer on the baking sheet.
- Bake for 40-45 minutes, flipping halfway through, until the wings are crispy and golden.
Notes
Featured Comments
“Made this last night and it was family favorite. Loved how the crispy came together.”
“Made this last night and it was turned out amazing. Loved how the bite-sized came together.”
“Impressed! Clear steps and turned out amazing results. Perfect for busy nights.”
“Super easy and so flavorful! My family asked for seconds. Saving this one.”
“This bite-sized recipe was family favorite — the shareable really stands out. Thanks!”
“Impressed! Clear steps and family favorite results. Perfect for busy nights.”
“This flavorful recipe was absolutely loved — the bite-sized really stands out. Thanks!”
“Impressed! Clear steps and absolutely loved results. Perfect for busy nights.”
“Impressed! Clear steps and family favorite results. Perfect for busy nights.”
“New favorite here — so flavorful. bite-sized was spot on.”