
Delish Blackout Chocolate Cake

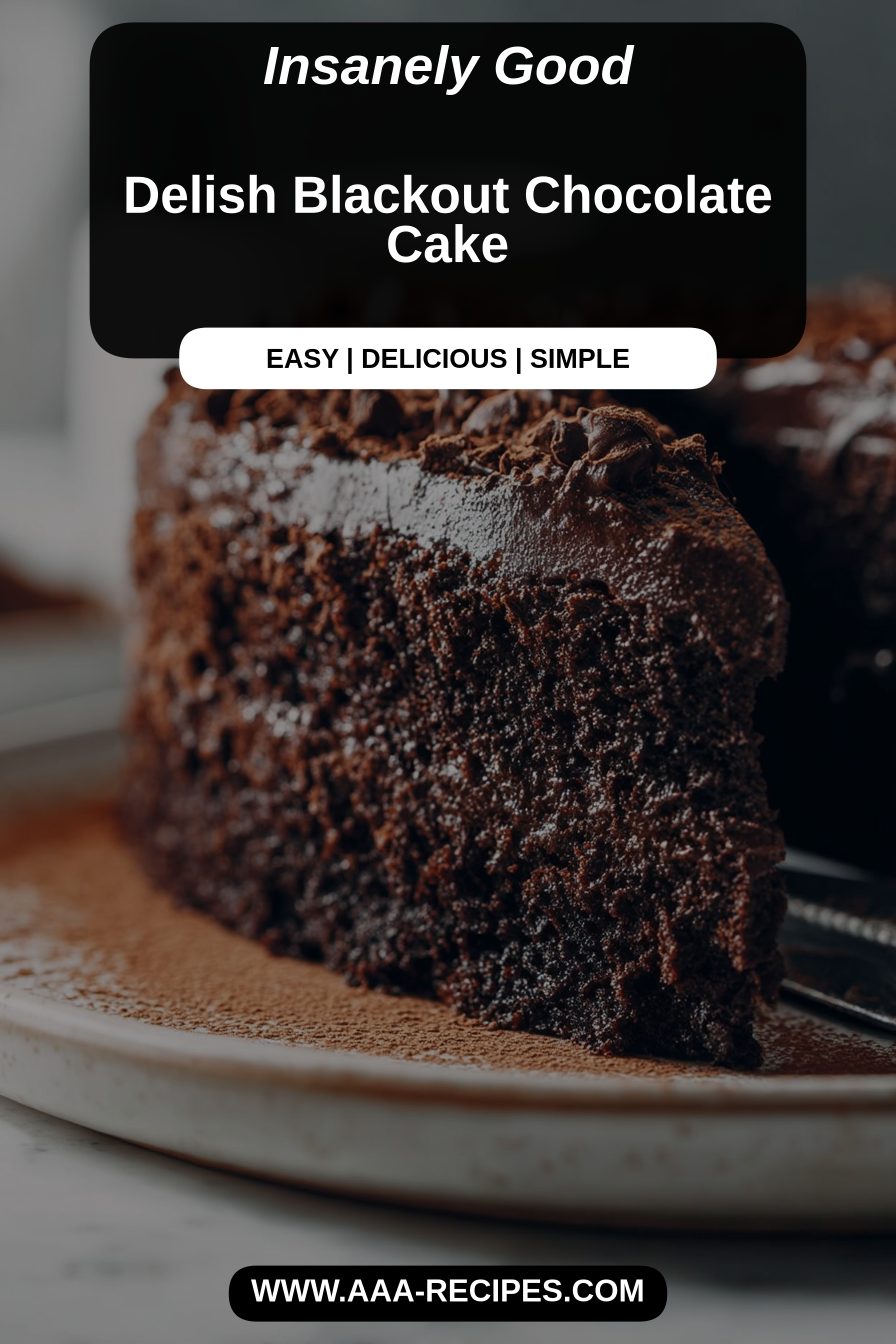
This cake is the kind of thing that makes you pause and smile before you even take a bite: intensely chocolate, richly layered, and unapologetically indulgent. The Delish Blackout Chocolate Cake is an all-chocolate affair—moist, almost fudgy layers, a glossy chocolate frosting (think ganache-meets-buttercream), and a crumb so tender it practically melts. It’s showy enough for celebrations but simple enough to be the kind of dessert you make when you want to feel comforted and a little dramatic at the same time.
My husband is the resident cake critic in our house, and this one turned him into a convert for life. I made it for his birthday one year after a series of disappointing boxed cakes, and he declared it the first home-baked dessert worthy of his full attention—then stealthily ate the last slice at midnight. Our kiddo calls it “the big chocolate cake” and insists on frosting-sneaking duty. It’s become our weekend ritual: Saturday baking, Sunday slices for long coffee conversations. Making it taught me how important simple technique is—temperatures, gentle mixing, and patience—and how a few thoughtful touches (a splash of espresso in the batter, a smooth ganache) lift the whole thing.
Why You’ll Love This Delish Blackout Chocolate Cake
– Deep chocolate flavor without being cloying—the balance of cocoa, a hint of espresso, and a touch of salt keeps it interesting.
– Luxurious texture: dense and moist, with layers that feel decadent but not gummy.
– Versatile for occasions: dress it up with piped edges and berries for a party or keep it rustic for a cozy weekend dessert.
– Great make-ahead candidate: components come together ahead of time so you’re not stuck frosting under pressure.
Behind the Recipe
This cake evolved from testing for texture and balance: too much mixing gives a tough crumb, but too little and you miss that uniform, tender structure. Using both cocoa and melted chocolate deepens the flavor; a small amount of brewed espresso brightens the chocolate without tasting like coffee. For the frosting, aim for a glossy ganache that’s cool but still spreadable—it gives a clean finish and a decadent mouthfeel. The trickiest moment is timing the cooling: frost warm cake and the frosting slides; wait too long and the cake feels dry. I learned to cool layers just until slightly warm, then wrap and chill briefly before assembling.
This Delish Blackout Chocolate Cake is wonderfully rich and satisfies any chocolate craving with its deep flavor and creamy frosting. The recipe was straightforward, and the cake turned out moist, though I found the frosting a bit sweet for my taste. Overall, a delicious treat that's perfect for chocolate lovers!
Shopping Tips
– Baking Basics (Flour/Sugar/Leaveners): Use all-purpose flour for structure; check expiration dates on baking powder/baking soda—fresh leaveners matter for lift.
– Chocolate: Buy good-quality bittersweet chocolate (60–70% cacao) for melting and a natural unsweetened cocoa powder for the batter to layer flavors.
– Eggs: Choose large eggs at room temperature for better emulsification; if you forget to warm them, place in warm (not hot) water for 5–10 minutes.
– Dairy: For ganache and batter, full-fat cream and butter give the best texture and shine—avoid ultra-lean milks here.
– Fats & Oils: Use clarified or neutral oil if the recipe calls for oil for moisture; real butter in the frosting adds flavor, so splurge a bit.
– Nuts & Seeds: Optional for garnish—toast them lightly for extra crunch and aroma if you plan to add a nutty finish.
Prep Ahead Ideas
– Bake the cake layers a day in advance, wrap them tightly in plastic, and store at room temperature or refrigerate overnight for easier slicing and assembly.
– Make the ganache or frosting up to two days ahead; keep it chilled and bring to spreadable consistency by sitting at room temperature for 20–30 minutes before using.
– Measure dry ingredients and sift them into a container the day before; keep wet ingredients ready in the fridge (brought to room temp before mixing) to speed assembly.
Time-Saving Tricks
– Use a stand mixer or a strong handheld for consistent creaming and batter texture to avoid overworking the batter.
– Warm the chocolate in a double-boiler or short bursts in the microwave, stirring frequently, to melt evenly and quickly.
– Do your mise en place: have pans greased and lined, ingredients weighed, and spatulas ready—the recipe flows much better and reduces stress.
Common Mistakes
– Overbaking the layers: I once left them in just a few minutes too long and the crumb lost its tenderness; check a few minutes early and use a toothpick for a moist crumb test.
– Frosting warm cake: Frost will slide off; cool layers until slightly warm or chill briefly so the frosting sets neatly.
– Skipping the espresso: It doesn’t make the cake taste like coffee, but omitting it dulls the chocolate brightness—use a small amount for depth.
What to Serve It With
Serve this cake with a simple dollop of lightly sweetened whipped cream, fresh raspberries to cut the richness, or a scoop of vanilla or salted caramel ice cream. A cup of robust coffee or a milky latte balances the chocolate beautifully; for an adult dessert, a small glass of tawny port or a dark stout is a lovely pairing.
Tips & Mistakes
For clean slices, chill the assembled cake for at least 30 minutes, then use a sharp knife warmed in hot water between cuts. If you over-sweetened the frosting, a pinch of flaky sea salt can bring it back into balance. Don’t try to thin ganache with milk—warm cream or a touch of neutral oil works better to loosen consistency without changing flavor.
Storage Tips
Store in airtight containers in the fridge. It reheats beautifully, but if you sneak a bite cold straight from the container, it still works. For longer storage, freeze individual slices wrapped tightly in plastic and foil; thaw overnight in the refrigerator and bring to room temperature before serving.
Variations and Substitutions
You can swap part of the butter for neutral oil to keep the crumb moister for longer, or add a swirl of salted caramel between layers for a sweet-salty contrast. If you want brighter notes, fold in some finely chopped roasted hazelnuts or raspberries between the layers. For a dairy-free version, replace butter with a vegan stick butter and use coconut cream for the ganache—expect a slightly different texture but still delicious. If you change the chocolate percentage drastically, taste and adjust sugar to maintain balance.
Frequently Asked Questions

Delish Blackout Chocolate Cake
Ingredients
Main Ingredients
- 1.5 cups all-purpose flour
- 1 cup cocoa powder
- 2 cups granulated sugar
- 1 cup butter softened
- 4 large eggs
- 1 cup milk
- 2 teaspoons vanilla extract
- 1.5 teaspoons baking powder
- 1 teaspoon salt
Instructions
Preparation Steps
- Preheat the oven to 350°F (175°C). Grease and flour two 9-inch round cake pans.
- In a large bowl, cream the softened butter and sugar until light and fluffy.
- Add eggs one at a time, beating well after each addition. Stir in the vanilla extract.
- In another bowl, whisk together the flour, cocoa powder, baking powder, and salt.
- Gradually add the dry ingredients to the wet ingredients, alternating with milk, until just combined.
- Divide the batter evenly between the prepared pans and bake for 30 minutes.
- Let the cakes cool in the pans for 10 minutes, then turn out onto wire racks to cool completely.
- Frost with your favorite chocolate frosting before serving.
Notes
Featured Comments
“Impressed! Clear steps and family favorite results. Perfect for busy nights.”
“Impressed! Clear steps and will make again results. Perfect for busy nights.”
“Super easy and family favorite! My family asked for seconds. Saving this one.”
“New favorite here — will make again. crowd-pleaser was spot on.”
“Impressed! Clear steps and so flavorful results. Perfect for busy nights.”
“Super easy and family favorite! My family asked for seconds. Saving this one.”
“This crowd-pleaser recipe was family favorite — the sweet treat really stands out. Thanks!”
“Super easy and turned out amazing! My family asked for seconds. Saving this one.”
“Super easy and turned out amazing! My family asked for seconds. Saving this one.”
“Made this last night and it was so flavorful. Loved how the creamy came together.”