
Delish Butterscotch Bar Recipes

There’s something incredibly nostalgic about butterscotch bars; they evoke memories of cozy kitchens and warm, sweet aromas wafting through the air. These delightful treats combine a buttery, caramel-like flavor with a chewy texture that’s simply irresistible. Whether enjoyed on a leisurely afternoon with a cup of coffee or as a sweet ending to a family dinner, they are sure to please bakers and dessert lovers alike. I find that their balance of sweet and salty makes them a stand-out recipe that you absolutely need to try.
In our household, these butterscotch bars have become a beloved staple. I remember the first time I made them—my husband came home after a long day, and the moment he walked through the door, the sweet scent pulled him into the kitchen faster than I could say “freshly baked.” We ended up sharing them with our kids, who were so captivated that they practically begged for seconds before they even finished their first piece! Now, it’s become a family tradition: we whip up a batch whenever there’s a special occasion or even just to sweeten a regular weeknight. It’s one of those recipes that not only fills your belly but also warms your heart with its simple, comforting charm.
Why You’ll Love This Delish Butterscotch Bar Recipes
One reason you’ll fall in love with this recipe is its simplicity—just a handful of ingredients and minimal prep time. The rich flavor that butterscotch brings is utterly enchanting, combining nostalgia with a heartwarming sweetness. They’re perfect for sharing or even keeping for yourself (I won’t judge!). Plus, whether you’re a seasoned baker or just starting out, these bars are incredibly forgiving and offer a delightful sense of accomplishment.
Behind the Recipe
What I’ve learned through countless attempts at making these bars is that the key to achieving that perfect chewiness lies in the baking time. It can be tempting to pull them out too soon, but patience truly pays off. One little trick I’ve discovered is to let them cool completely in the pan before slicing; this helps them firm up and makes cutting a breeze. A common pitfall is letting them overbake, which can turn their delightful texture into something too crumbly. I like to set a timer a few minutes short of the recommended time, so I can keep an eye on them.
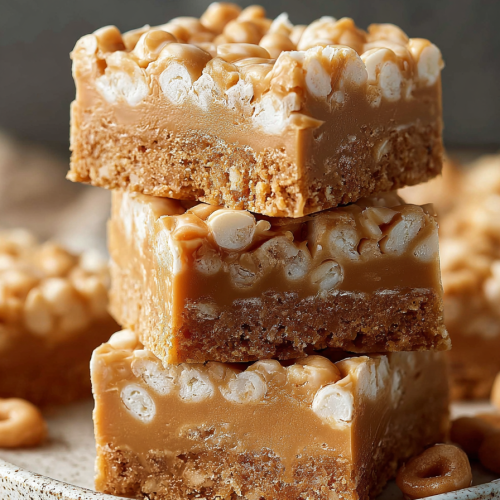
These butterscotch bars are a delightful treat! The recipe is easy to follow, and the end result is a sweet, chewy goodness that everyone loves. I might add a pinch of sea salt next time to enhance the flavors even more!
Shopping Tips
When selecting ingredients, opt for high-quality brown sugar; it’s the backbone of that deep butterscotch flavor. You want to look for a moist, clumpy texture. For butter, I always go for unsalted to have better control over the sweetness. When it comes to chocolate chips, while store brands work just fine, using a premium brand can elevate the flavor—and believe me, it makes a difference in these bars. Don’t forget to glance at the expiration dates on your baking supplies to ensure you’re using the freshest ingredients possible.
Prep Ahead Ideas
You can streamline your baking process by measuring out your dry ingredients the night before. This includes flour, baking powder, and sugars—just pop them into labeled containers to save time. If you’re really in a bind, you can even prep the batter in advance and refrigerate it for a day, but make sure to let it come back to room temperature before baking for the best texture.
Time-Saving Tricks
Using pre-chopped nuts or chocolate chips, if you’re feeling fancy, can save a bit of time. I also love a good mise en place; organizing your ingredients beforehand not only speeds up the process but reduces the likelihood of forgetting any components. Slowing down during mixing is also crucial—not overmixing once you add the dry ingredients helps ensure the bars are soft and tender.
Common Mistakes
One of the most frequent missteps is overbaking. Keep a close eye on them, particularly in the last few minutes, and test for doneness with a toothpick—it should come out with a few moist crumbs. I once mistook bars that looked perfect for being fully cooked, only to find that they were overly dry. If you do mess up and they end up too crumbly, consider crumbling them over yogurt or ice cream for a delicious twist.
What to Serve It With
These butterscotch bars are delectable on their own, but pairing them with a scoop of vanilla ice cream or a dollop of fresh whipped cream elevates the experience. A drizzle of warm chocolate sauce can take them to the next level if you’re feeling indulgent!
Tips & Mistakes
Cutting these bars while they’re still warm might seem tempting, but waiting until they are cool will yield cleaner slices. Store any leftovers (if you can resist!) in an airtight container at room temperature to maintain their chewy texture.
Storage Tips
Store in airtight containers in the fridge. It reheats beautifully, but if you sneak a bite cold straight from the container, it still works.
Variations and Substitutions
You can play around with the mix-ins; try adding nuts or dried fruit for added texture and flavor. For a gourmet touch, swapping some of the brown sugar for brown butter can deepen the flavor profile beautifully. While I love the classic approach to these bars, don’t hesitate to experiment to suit your taste.
Frequently Asked Questions
Delish Butterscotch Bar Recipes
Ingredients
Main Ingredients
- 1 cup unsalted butter
- 1.5 cups brown sugar packed
- 1 cup granulated sugar
- 4 large eggs room temperature
- 2 cups all-purpose flour
- 1 teaspoon vanilla extract
- 0.5 teaspoon salt
- 1 cup butterscotch chips
Instructions
Preparation Steps
- Preheat your oven to 350°F (175°C) and grease a 9x13 inch baking dish.
- In a large mixing bowl, cream together the butter, brown sugar, and granulated sugar until smooth.
- Beat in the eggs, one at a time, then stir in the vanilla.
- Combine the flour and salt, then gradually add to the creamed mixture.
- Fold in the butterscotch chips.
- Spread the batter evenly in the prepared baking dish.
- Bake for 25-30 minutes, or until a toothpick inserted in the center comes out clean.
- Allow to cool before cutting into bars and serving.
Notes
Featured Comments
“New favorite here — so flavorful. crowd-pleaser was spot on.”
“Impressed! Clear steps and absolutely loved results. Perfect for busy nights.”
“Impressed! Clear steps and absolutely loved results. Perfect for busy nights.”
“Made this last night and it was will make again. Loved how the sweet treat came together.”
“Made this last night and it was family favorite. Loved how the crowd-pleaser came together.”
“Made this last night and it was absolutely loved. Loved how the rich came together.”
“Super easy and family favorite! My family asked for seconds. Saving this one.”
“Made this last night and it was so flavorful. Loved how the crowd-pleaser came together.”
“New favorite here — will make again. creamy was spot on.”
“Super easy and will make again! My family asked for seconds. Saving this one.”